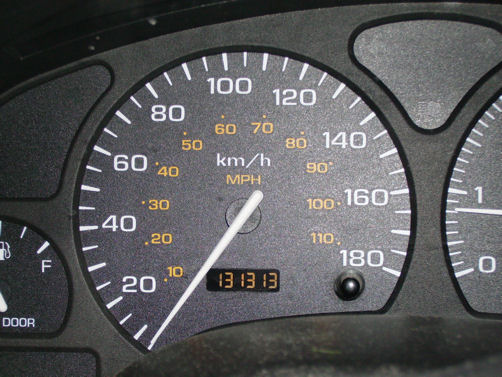
Browsed by
Tag: car

How to: Replace an AC Compressor from a GM 3100 engine

How to: Replace an AC Compressor from a GM 3100 engine

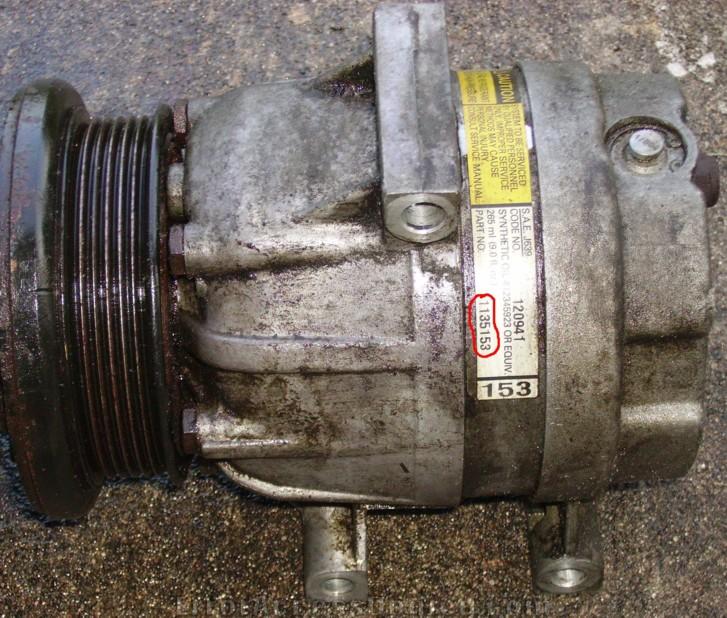
These instructions are for any GM car with the 3100 engine, with air conditioning. (Engine code: M) These engines are found in the 1994-1996 Chevrolet Corsica, among other cars and years.

Some background info: The AC Compressor is held up with 3 LONG bolts. I’m not talking little things, I’m talking 4″ bolts.

  1. TAKE YOUR CAR TO A SHOP AND GET THEM TO REMOVE THE REFRIGERANT.
  2. Jack up the car.
  3. 3) Remove the passenger’s side splash guard. That’s the one in front of the wheel, there are 3 or 4 bolts holding it in place in the wheel well, and 2 or 3 underneath the car. After they’re off, the guard should just sorta flap around, because it’s still semi-permanently attached to the top of the wheel well. Fine. I don’t care.
  4. Remove the serpentine belt.
  5. Get back under the car and find the AC Compressor. It shouldn’t be hard to find, it’s the thing on the serpentine belt closest to the bottom of the car (it should be right in your face), and has AC pipes connected to it.
  6. Remove the AC Clutch plug, there are little tabs on both sides (Front and back) that hold it in. You have to pull those away from the connector and then pull the connector away from the compressor.
  7. You should see the two AC pipes that connect to the compressor, with a bolt in the middle. One is the high-pressure, and one is the low-pressure. SLOWLY remove that bolt, and if it starts to hiss, STOP. If you got the refrigerant removed properly, the pressure (if any) should be compressed air from the compressor running on empty. Let it hiss out. Once it’s done, remove the bolt, and cover the pipe connectors with a cloth or something. You don’t want to get them dirty.
  8. You should see two screws. One is a big long one, angled towards the engine block. You want to unscrew that one. The other one is the oil drain for the compressor. If you unscrew that one, it makes a big mess. Trust me. If you unscrew it and find it’s only a 2″ long screw, PUT IT BACK.
  9. Now, from above (Yes, get out from under the car for this)… There are two bolts on the upper side. On my car, they were right smack-dab behind a coolant hose. The hose was flexible enough i just sorta pushed it out of the way. Remove those two bolts, be careful on the last one, cause the whole thing will drop somewhat.
  10. Get back under the car, and manouver the thing out through the bottom. It’s at least a good 20 pounds, don’t drop it on the ground or on your face. The first would be bad for the compressor, the second would be bad for your complexion.
  11. Look around for where the little dog-bone extension went to, it probably fell somewhere after you took out the last bolt. This guy holds the compressor away from the engine so there’s room in between the two.
  12. “Installation is reverse of removal”

About the picture: Here it is, upside-down. I’ve circled the part number of the compressor assembly in red. This is what you need to get yourself a new or used one. (IE, this is the number that carpart.com asks for)

I originally posted this article on Corsicas.com on January 18, 2006. To see original text, click here

How to: Fix a rear door that won’t lock [Corsica]

How to: Fix a rear door that won’t lock [Corsica]

These instructions are for a 1991-1996 Chevrolet Corsica, the instructions are similar for a pre-1991 Corsica, with the exception of the removal of the door panel.

  1. Remove your door panel: There are 2 screws in the handle assembly (one behind the door handle, one behind the lock) and 2 screws in the handle.

    Use an upholstery remover to take off the window crank (if you have crank windows). Note that there is a cotter pin holding the crank in place. You have to pull it off before the handle comes free.

    Once the fixtures are free, the door panel can be pulled off. Don’t worry about giving it some force, the whole thing is just snapped on.

  2. Unscrew the Door Lock mechanism: There are 3 Torx bolts on the side of the door. You can remove them.
  3. (This is the fun part) Remove the door lock assembly: Drill out the rivots holding the assembly together. I told you this was going to be fun. (See picture. Rivots marked in red.)

    Once the rivots are removed, you can pull out the assembly (see picture) and fix what’s wrong.

    In my case, the lock wasn’t locking, and it was because the lock part of it was siezed with rust. I gave it some WD40 to loosen it, and then slopped on some heavy grease.

  4. (Maybe even more fun..) Reinstalling the door lock assembly: Installation is the reverse of removal, with one exception. Note the yellow-tipped lever. This is going to be the bane of your existance for the next 3 hours. Now, take a flashlight and look into the hole in the door. Note the ridiculously undersized mount that it goes into. (It’s attached to the interior of the outside door handle.) It’s a small, rectangular hole into which that yellow-tipped lever has to go into. This takes a lot of patience and a little luck, as well as hand-eye coordination and imagination (You can’t always see where it is.) Once you have it in place, and the outside handle catches when you open it instead of flailing freely, then you’re done. Screw in the 3 Torx bolts that you removed in step 2 for support, then re-rivot the 4 rivots you removed in step 3.
  5. Testing and Decorations: Test to make sure the door closes properly. If it doesn’t, check the torx bolts for proper mounting and tightness. Sit the door panel on to the door frame, and push the velcro-like connectors together, as well as screw in the handle to hold it in place. Also, good luck with those snaps that were unsnapped when the door came off. Reinstall the interior door handle stuff with the 2 screws, ensuring that the door lock rod is securely snapped into the door lock button/handle.

I originally posted this article on Corsicas.com on December 6, 2005. To see original text, click here
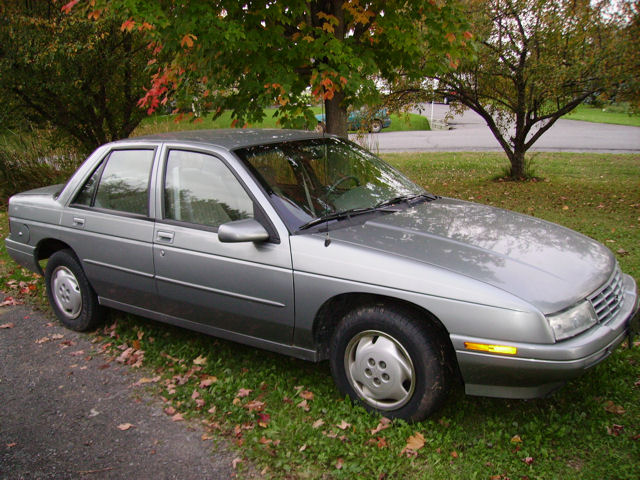