Browsed by
Tag: linux

HP Touchpad Hardware [Preliminary]

HP Touchpad Hardware [Preliminary]

Although this is an article on hardware, I’m going to be using software to probe it. This is from a 32GB HP Touchpad, though the 16GB should be the same, barring the difference in storage.

/proc/cpuinfo:

Processor       : ARMv7 Processor rev 2 (v7l)
processor       : 0
BogoMIPS        : 13.52

Features        : swp half thumb fastmult vfp edsp neon vfpv3
CPU implementer : 0x51
CPU architecture: 7
CPU variant     : 0x0
CPU part        : 0x02d
CPU revision    : 2

Hardware        : TENDERLOIN
Revision        : 0000
Serial          : 0000000000000000

The touchpad runs on a Qualcomm Snapdragon dual-core CPU, so I would take this output with a grain of salt: It’s only showing one core, and my touchpad is in powersave mode, so the bogomips, as usual, is way off.

Now for the more interesting stuff, like i2c devices.

cat /sys/bus/i2c/devices/*/name: (with annotations)

mt9m113– Aptina Webcam SoC

  • /sys/devices/i2c-1/1-0078

a6_0 – Battery monitor – Battery?

  • /sys/devices/i2c-3/3-0031
  • This one seems to have information on voltage, charge percentage, etc.
  • Seems to be the battery monitor
  • Here are the values/categories for the Veer (for comparison and info)
  • A6 Version: HW: 255, FW (M.m.B): 2.13.25, ManID: 28769, ProdTyp: 1281

a6_1 – Battery monitor – Charger?

  • /sys/devices/i2c-3/3-0032
  • This one has info in acc_data_*, but not voltage
  • Seems to be the battery charging circuit
  • A6 Version: HW: 255, FW (M.m.B): 2.7.23, ManID: 28769, ProdTyp: 1793

LM8502– National Semiconductor “Smart Lighting” IC

  • /sys/devices/i2c-3/3-0033
  • Fun: The LM8502 driver brings out the vibrator, LEDs (home button LEDs?), flash (for camera? I dont’ think the TP has one),

wm8958– Wolfson Microelectronics Audio Hub w/ 3 Digital Audio interfaces & DSP

  • /sys/devices/i2c-4/4-001a
  • Fun: Driver brings out some GPIO pins

maXTouch– Atmel’s family of “Unlimited-Touch” Touchscreen controllers

pm8058-core – Qualcomm Power Management IC

  • /sys/devices/i2c-6/6-0055
  • The datasheet for this one is kept under wraps?
  • From what the driver brings out, we can see that it controls power to the charger, GPIO, MPP (Multi-Purpose Pins), PWM, Power button, RTC, TM (IC Temperature Monitor), UPL(?), and the vibrator

pm8901-core – Qualcomm Power Management IC (No datasheet?)

  • /sys/devices/i2c-7/7-0055
  • The datasheet for this one is kept under wraps?
  • The driver brings out MPP (Multi-Purpose Pins), regulators, and a Temperature Monitor.
  • (Maybe this one is used for large loads, whereas the pm8058 is for smaller loads?)

QUP I2C adapter – (Six) – Qualcomm Universal Peripheral [cite]

  • /sys/devices/i2c-0 all the way through i2c-5

MSM SSBI adapter – (Three) – Qualcomm MSM-series “Single-Wire Serial Bus Interface” [cite]

  • /sys/devices/i2c-6 through i2c-8

cat /etc/fstab:

  • # <filesystem>  <mount point>   <type>  <options>       <dump>  <pass>
  • rootfs  /       ext3    ro,suid,dev,exec,auto,nouser,async,noatime      1       1
  • /dev/mapper/store-var   /var    ext3    noatime,data=writeback  0       0
  • /dev/mapper/store-cryptodb      /var/db ext3    noauto,noatime,data=ordered     0       0
  • /dev/mapper/store-cryptofilecache       /var/file-cache ext3    noauto,noatime,user_xattr       0       0
  • /dev/mapper/store-log   /var/log        ext3    noatime 0       0
  • /dev/mapper/store-update        /var/lib/update ext3    noauto,noatime  0       0
  • proc    /proc   proc    defaults        0       0
  • devpts  /dev/pts        devpts  mode=0620,gid=5 0       0
  • tmpfs   /tmp    tmpfs   size=40M,mode=1777      0       0
  • tmpfs   /var/run        tmpfs   size=16M,mode=1777      0       0
  • tmpfs   /var/tmp        tmpfs   size=32M,mode=1777      0       0
  • tmpfs   /media/ram      tmpfs   defaults        0       0
  • /dev/mapper/store-media /media/internal vfat    utf8,shortname=mixed,umask=0000 0       0

/dev/input/event0 is the home button and volume button device
/dev/input/event1 is the power button device
/dev/bt_uart is the Bluetooth serial stream

/proc/tty/drivers: (showing some promising signs of USB-Host ability)

/dev/tty             /dev/tty        5       0 system:/dev/tty
/dev/console         /dev/console    5       1 system:console
/dev/ptmx            /dev/ptmx       5       2 system
/dev/vc/0            /dev/vc/0       4       0 system:vtmaster
usbserial            /dev/ttyUSB   188 0-253 serial
acm                  /dev/ttyACM   166 0-31 serial
msm_serial_hsl       /dev/ttyS     243 0-3 serial
pty_slave            /dev/pts      136 0-1048575 pty:slave
pty_master           /dev/ptm      128 0-1048575 pty:master
pty_slave            /dev/ttyp       3 0-255 pty:slave
pty_master           /dev/pty        2 0-255 pty:master
smd_tty_driver       /dev/smd      253 0-36 serial
unknown              /dev/tty        4 1-63 console

More to come.
How to make a 5-Bay NAS Box for under $400

How to make a 5-Bay NAS Box for under $400

What you will need:

Reasoning:

  • Case: If space and/or looks are an issue, get a Lian Li PC-Q08, otherwise just get any generic case that will accept a Mini-ITX board and 5 (or 6, like the PC-Q08) hard drives. I chose the PC-Q08 because it was the only reasonably small, well-ventilated case for Mini-ITX and six 3.5″ drives. (It can also hold a 2.5″ hard drive in a space underneath the 5.25″ bay, as I’ll discuss later)
  • Power Supply: I went with the SeaSonic 350W SS-350ET as it was one of the lowest-powered models available (except for the 300W version, which seems to be hard to find), and was from a reputable power supply manufacturer. It supports ATX2.31 and has received the 80 Plus Bronze rating for efficiency. Although it is still overkill for what will be going into this machine, it will allow for adding a graphics card for HTPC use if you decide to go that route either now or in the future.
  • Motherboard/CPU: ASUS E35M1-I — If you are going to use your NAS as an HTPC as well, get the Deluxe version. If you’re going all-out for storage capacity, get the regular, non-deluxe one (The regular has 6 SATA ports, Deluxe only has 5)
  • RAM: This is a bit of a tricky one, as the motherboard tops out at PC3-8500 (DDR3-1066), single channel. That speed of memory is pretty scarce compared to its faster sibling, PC3-10666, and if nothing else, the PC3-10666 will give you more stability. I’d recommend the Mushkin 996992 Silverline PC3-10666 8GB (2x4GB Kit) as it fills the motherboard up to its maximum for memory without breaking the bank.

    I couldn’t get my hands on the Mushkin 996992 memory, and the Mushkin 997667
    Blackline PC3-12800 8GB (2x4GB Kit)
    was actually cheaper than buying two no-name, bottom-of-the-barrel 4GB sticks of PC3-10666 memory.

    My reasoning for maxing out the memory is that we can use this later on to set up RAM drives (tmpfs) to speed up generic tasks and keep our drives spun down longer to save power. If this isn’t your cup of tea, feel free to grab whatever memory best suits your needs.

  • Hard Disk (OS): For power savings, I opted to use a 2.5″ drive for my system disk as it takes substantially less power to operate. I considered a Seagate Momentus XT for the added benefit of having a small amount of SSD storage, but the benchmarks for a server-type machine don’t support spending the extra money. I settled on a WD Scorpio Black 500GB drive (WD5000BEKT)

    As an added bonus, the Lian Li case that I discussed earlier has a special hiding spot for a 2.5″ drive so that it won’t take up any of the 3.5″ bays (leaving a whopping 6 3.5″ bays for possible RAID storage! Unfortunately, the motherboard only has 6 SATA ports, though if you really wanted to have a 6-bay RAID, you could always add a SATA board in the PCIe slot.)

  • Hard Disks (RAID): For this build, I will be making a RAID out of Western Digital Green 2TB SATA-II drives (WD20EARS).

    As of this writing, 2TB drives have the lowest Cost/GB of any 3.5″ drive. 3TB drives, while available, are disproportionately expensive as they are still solely in the realm of the early adopter.

    A RAID 5 setup requires (as a bare minimum) 3 drives. You can always add more in later; the RAID array will just expand to accommodate the extra space.

    Unfortunately, whereas most Western Digital drives used to have a feature known as TLER (Time-Limited Error Recovery) [Wikipedia] hidden in the firmware, this feature now seems to be only available on Enterprise-level drives. This isn’t a problem for Linux software RAID (mdadm) as it just waits for the drive to complete its recovery, but may be a problem if you plan on using a RAID controller card.

Add your driver and addr_server to monit: How-To [Beta]

Add your driver and addr_server to monit: How-To [Beta]

This how-to is still in testing. I got it to work, however, the how-to may not be totally complete or correct. Please let me know how it works for you.

  1. Set up monit Monitoring Service on your Linux box
  2. Add the following to your /etc/monit/monitrc: (The “as uid” line is optional, use it only if you want to run your mud as a different user)

    check process driver with pidfile /home/mud/bin/driver.pid
    start program "/home/mud/bin/startdriver"
    as uid mud and gid mud

  3. Optional: If you want addr_server, add this to /etc/monit/monitrc too: (The “as uid” line is optional, use it only if you want to run your addr_server as a different user)

    check process addr_server with pidfile /home/mud/bin/addr_server.pid
    start program "/home/mud/bin/startaddr_server"
    as uid mud and gid mud

  4. Create a file called startdriver in your MUD’s “bin” directory: (change /home/mud to the location of your mud’s directory (the one containing ‘bin’ and ‘lib’)):

    #!/bin/bash

    export MUDHOME="/home/mud"

    umask 007
    ulimit -n 120
    $MUDHOME/bin/driver $MUDHOME/lib/secure/cfg/mudos.cfg &

    rm driver.pid
    ps -ef | grep /bin/[d]river | awk '{print $2}' > driver.pid

  5. Optional: If you want to set up addr_server, create a file called startaddr_server in your MUD’s “bin” directory (again, change /home/mud to the location of your mud directory):

    #!/bin/bash

    /home/mud/bin/addr_server 9999 &

    rm addr_server.pid
    ps -ef | grep /bin/[a]ddr_server | awk '{print $2}' > addr_server.pid

  6. Restart the monit service:
    /etc/init.d/monit restart
WRTSL54GS Hardware & Architecture

WRTSL54GS Hardware & Architecture

Here’s the dump of /proc/cpuinfo:

# cat /proc/cpuinfo
system type             : Broadcom BCM4704 chip rev 8
processor               : 0
cpu model               : BCM3302 V0.6
BogoMIPS                : 263.78
wait instruction        : no
microsecond timers      : yes
tlb_entries             : 32
extra interrupt vector  : no
hardware watchpoint     : no
VCED exceptions         : not available
VCEI exceptions         : not available

Here’s the dump of /proc/interrupts:

# cat /proc/interrupts
           CPU0
  2:      26752            MIPS  eth2, ehci_hcd
  3:        223            MIPS  serial
  4:       2476            MIPS  eth0
  7:      95322            MIPS  timer
ERR:          0

Here is the dump of /proc/pci:

# cat /proc/pci
PCI devices found:
  Bus  0, device   0, function  0:
    Class 0501: PCI device 14e4:0800 (rev 8).
      IRQ 3.
      Non-prefetchable 32 bit memory at 0x18000000 [0x18000fff].
      Non-prefetchable 32 bit memory at 0x1fc00000 [0x1fffffff].
      Non-prefetchable 32 bit memory at 0x1c000000 [0x1dffffff].
      Non-prefetchable 32 bit memory at 0x1a000000 [0x1bffffff].
  Bus  0, device   1, function  0:
    Class 0200: PCI device 14e4:4713 (rev 8).
      IRQ 4.
      Master Capable.  Latency=64.
      Non-prefetchable 32 bit memory at 0x18001000 [0x18001fff].
  Bus  0, device   2, function  0:
    Class 0200: PCI device 14e4:4713 (rev 8).
      IRQ 5.
      Master Capable.  Latency=64.
      Non-prefetchable 32 bit memory at 0x18002000 [0x18002fff].
  Bus  0, device   3, function  0:
    Class 0c03: PCI device 14e4:4715 (rev 8).
      IRQ 6.
      Non-prefetchable 32 bit memory at 0x18003000 [0x18003fff].
  Bus  0, device   4, function  0:
    Class 0604: PCI device 14e4:0804 (rev 8).
      IRQ 2.
      Non-prefetchable 32 bit memory at 0x18004000 [0x18004fff].
      Non-prefetchable 32 bit memory at 0x8000000 [0xfffffff].
  Bus  0, device   5, function  0:
    Class 0b30: PCI device 14e4:0816 (rev 8).
      IRQ 2.
      Non-prefetchable 32 bit memory at 0x18005000 [0x18005fff].
  Bus  0, device   6, function  0:
    Class 0703: PCI device 14e4:4712 (rev 8).
      IRQ 2.
      Non-prefetchable 32 bit memory at 0x18006000 [0x18006fff].
  Bus  0, device   7, function  0:
    Class 1000: PCI device 14e4:4718 (rev 8).
      IRQ 2.
      Non-prefetchable 32 bit memory at 0x18007000 [0x18007fff].
  Bus  0, device   8, function  0:
    Class 0500: PCI device 14e4:080f (rev 8).
      IRQ 3.
      Non-prefetchable 32 bit memory at 0x18008000 [0x18008fff].
      Non-prefetchable 32 bit memory at 0x0 [0x7ffffff].
      Non-prefetchable 32 bit memory at 0x10000000 [0x17ffffff].
      Non-prefetchable 32 bit memory at 0x80000000 [0x9fffffff].
  Bus  1, device   0, function  0:
    Class 0600: PCI device 14e4:4704 (rev 0).
      IRQ 2.
      Master Capable.  Latency=64.
      Non-prefetchable 32 bit memory at 0x40000000 [0x40001fff].
      Prefetchable 32 bit memory at 0x0 [0x7ffffff].
  Bus  1, device   1, function  0:
    Class 0280: PCI device 14e4:4318 (rev 2).
      IRQ 2.
      Master Capable.  Latency=64.
      Non-prefetchable 32 bit memory at 0x40002000 [0x40003fff].
  Bus  1, device   2, function  0:
    Class 0c03: PCI device 1033:0035 (rev 67).
      IRQ 2.
      Master Capable.  Latency=8.  Min Gnt=1.Max Lat=42.
      Non-prefetchable 32 bit memory at 0x40004000 [0x40004fff].
  Bus  1, device   2, function  1:
    Class 0c03: PCI device 1033:0035 (rev 67).
      IRQ 2.
      Master Capable.  Latency=8.  Min Gnt=1.Max Lat=42.
      Non-prefetchable 32 bit memory at 0x40005000 [0x40005fff].
  Bus  1, device   2, function  2:
    Class 0c03: PCI device 1033:00e0 (rev 4).
      IRQ 2.
      Master Capable.  Latency=68.  Min Gnt=16.Max Lat=34.
      Non-prefetchable 32 bit memory at 0x40006000 [0x400060ff].
MSNTV2 Hardware & Architecture

MSNTV2 Hardware & Architecture

Here’s what phpSysInfo has to say:

Processors  	1
Model 	Mobile Intel(R) Celeron(TM) CPU 733MHz
CPU Speed 	731.08 Mhz
Cache Size 	256.00 KB
System Bogomips 	1445.88
PCI Devices 	
-	Ethernet controller: Intel Corporation 82801DB PRO/100 VE
-	Host bridge: Intel Corporation 82830 830 Chipset Host Bridge
-	IDE interface: Intel Corporation 82801DB
-	ISA bridge: Intel Corporation 82801DB/DBL
-	Modem: Intel Corporation 82801DB/DBL/DBM
-	Multimedia audio controller: Intel Corporation 82801DB/DBL/DBM
-	PCI bridge: Intel Corporation 82801 PCI Bridge
-	SMBus: Intel Corporation 82801DB/DBL/DBM
-	(3x) USB Controller: Intel Corporation 82801DB/DBL/DBM
-	USB Controller: Intel Corporation 82801DB/DBM
-	VGA compatible controller: Intel Corporation 82830 CGC [Chipset Graphics Controller]
IDE Devices 	
-	hda: SanDisk SDCFB-64 (Capacity: 61.25 MB)
-	hdc: WDC WD1600JB-00GVC0 (Capacity: 149.05 GB)
SCSI Devices 	none
USB Devices 	none

Here’s the dump of /proc/cpuinfo:

$ cat cpuinfo
processor       : 0
vendor_id       : GenuineIntel
cpu family      : 6
model           : 11
model name      : Mobile Intel(R) Celeron(TM) CPU          733MHz
stepping        : 4
cpu MHz         : 731.087
cache size      : 256 KB
fdiv_bug        : no
hlt_bug         : no
f00f_bug        : no
coma_bug        : no
fpu             : yes
fpu_exception   : yes
cpuid level     : 2
wp              : yes
flags           : fpu vme de pse tsc msr pae mce cx8 mtrr pge mca cmov pat pse36 mmx fxsr sse
bogomips        : 1445.88

An explaination of what the flags are is available here: IntelĀ® 64 and IA-32 Architectures Software Developer’s Manuals in Volume 2: Instruction Set Reference, specifically pages

3-172

to

3-176

of Volume 2A: Instruction Set Reference

Here is the output of lspci on an MSNTV2:

$ lspci -tvv
-[00]-+-00.0  Intel Corporation 82830 830 Chipset Host Bridge
      +-02.0  Intel Corporation 82830 CGC [Chipset Graphics Controller]
      +-1d.0  Intel Corporation 82801DB/DBL/DBM (ICH4/ICH4-L/ICH4-M) USB UHCI Controller #1
      +-1d.1  Intel Corporation 82801DB/DBL/DBM (ICH4/ICH4-L/ICH4-M) USB UHCI Controller #2
      +-1d.2  Intel Corporation 82801DB/DBL/DBM (ICH4/ICH4-L/ICH4-M) USB UHCI Controller #3
      +-1d.7  Intel Corporation 82801DB/DBM (ICH4/ICH4-M) USB2 EHCI Controller
      +-1e.0-[01]----08.0  Intel Corporation 82801DB PRO/100 VE (CNR) Ethernet Controller
      +-1f.0  Intel Corporation 82801DB/DBL (ICH4/ICH4-L) LPC Interface Bridge
      +-1f.1  Intel Corporation 82801DB (ICH4) IDE Controller
      +-1f.3  Intel Corporation 82801DB/DBL/DBM (ICH4/ICH4-L/ICH4-M) SMBus Controller
      +-1f.5  Intel Corporation 82801DB/DBL/DBM (ICH4/ICH4-L/ICH4-M) AC'97 Audio Controller
      \-1f.6  Intel Corporation 82801DB/DBL/DBM (ICH4/ICH4-L/ICH4-M) AC'97 Modem Controller

Here’s the dump of /proc/ioports:

$ cat /proc/ioports
0000-001f : dma1
0020-0021 : pic1
0040-0043 : timer0
0050-0053 : timer1
0060-006f : keyboard
0070-0077 : rtc
0080-008f : dma page reg
00a0-00a1 : pic2
00c0-00df : dma2
00f0-00ff : fpu
0170-0177 : ide1
01f0-01f7 : ide0
02f8-02ff : serial
0376-0376 : ide1
03c0-03df : ega
03f6-03f6 : ide0
03f8-03ff : serial
0500-053f : 0000:00:1f.0
0cf8-0cff : PCI conf1
1000-107f : 0000:00:1f.0
8000-801f : 0000:00:1d.0
8020-803f : 0000:00:1d.1
8040-805f : 0000:00:1d.2
9000-903f : 0000:01:08.0
  9000-903f : e100
a020-a02f : 0000:00:1f.1
a040-a05f : 0000:00:1f.3
a100-a1ff : 0000:00:1f.5
a200-a23f : 0000:00:1f.5
a300-a3ff : 0000:00:1f.6
a400-a47f : 0000:00:1f.6

Here’s the dump of /proc/interrupts:

$ cat /proc/interrupts
           CPU0
  0:   32149675          XT-PIC  timer
  2:          0          XT-PIC  cascade
  4:        169          XT-PIC  serial
  5:    6825495          XT-PIC  eth0
  8:          2          XT-PIC  rtc
 14:         87          XT-PIC  ide0
 15:   14329233          XT-PIC  ide1
NMI:          0
LOC:          0
ERR:          0
MIS:          0

Update:

Probing for `SMSC 47M15x/192 Super IO Fan Sensors'
Success... found at address 0x0800

It looks like the fan controller is an SMSC 47M1, meaning you can control and monitor fan speed using programs such as lm-sensors. Here is the doc file for the SMSC 47M1.

MSNTV2 Boot Tutorial

MSNTV2 Boot Tutorial

Well, it’s 3AM, but I got my first MSNTV2 server running using linux kernel 2.6.12.5, so here’s a writeup on how it’s done.

This is provided with no guarantee of accuracy or completeness

This tutorial assumes the following:

  • You will be installing a hard drive into the MSNTV2 box via an IDE cable.
    • (The process for a USB drive is similar, with the exception that you must compile the kernel as such to be able to boot from USB, and you must append rootwait=10 to the CMDLINE file)
  • You have soldered an IDE header onto the MSNTV2 motherboard
  • You have already patched the BIOS of the MSNTV2 (See “Getting into the service menu” and “Flashing the patch” on the Toc2rta Wiki
  • You already have a CompactFlash card prepared as detailed in the Toc2rta Wiki, with:
    • a CMDLINE file (root=/dev/hdc3 init=/sbin/init console=ttyS0,115200)
    • BIOS.BIN (You’ll have to search Google for it)
    • (We will be compiling the VMLINUX.BIN in this tutorial)
  • You are currently using the hard drive you wish to install into the MSNTV2. It currently has:

Note: The CompactFlash card is known as /dev/hda to the MSNTV2 box. Once the drive is installed into the MSNTV2, it will be known as /dev/hdc (If the drive has no jumpers present) or /dev/hdd (If jumpered as ‘slave’).

For those trying to compile it for themselves, and for myself for later reference:

  1. Download linux-2.6.12.5.tar.gz
  2. Move linux-2.6.12.5.tar.gz to /usr/src/ (mv linux-2.6.12.5.tar.gz /usr/src)
  3. Change directories to /usr/src/ (cd /usr/src)
  4. Extract linux-2.6.12.5.tar.gz into /usr/src/ (tar -xvf linux-2.6.12.5.tar.gz)
  5. Add the .config file:
    1. Download the attachment to this article
    2. Change directories to where the attachment was downloaded (Example: cd ~/Desktop/)
    3. Copy it to the /usr/src/linux-2.6.12.5/ folder and rename it to .config (cp msntv2-config-2.6.12.5 /usr/src/linux-2.6.12.5/.config)
  6. Make the kernel and modules:
    1. Change directories to /usr/src/linux-2.6.12.5 (cd /usr/src/linux-2.6.12.5)
    2. Make sure the source code has no temporary files, etc (make clean)
    3. Build the Kernel (make)
      1. If you are prompted whether or not to include an item that was not included in the .config, just press Enter, and it will select the default recommended setting.
    4. Install the modules (make modules_install)
  7. Copy the vmlinux.bin to the first partition of your CF card.
    1. Mount your CF card if not already done. Note: Many GUIs will do this for you. The mounted path and device may vary. (Example: mount /dev/sda1 /media/sda1)
    2. Copy the vmlinux.bin from /usr/src/linux-2.6.12.5/arch/i386/boot/compressed/vmlinux.bin to the first partition of your CF card. (Example, assuming a USB card reader mounted to /media/sda1: cp /usr/src/linux-2.6.12.5/arch/i386/boot/compressed/vmlinux.bin /media/sda1/) 
  8. Edit your /etc/fstab file: (See attachments for an example of a modified fstab)
    1. Change any references of /dev/hda to /dev/hdc
    2. Remove or comment out any /dev/cdrom entry
    3. [Experimental, for me at least] Add an entry for the first partition of the CompactFlash (/dev/hda1 none vfat defaults 0 0)
  9. Install this hard drive onto the MSNTV2 using an EIDE ribbon cable.

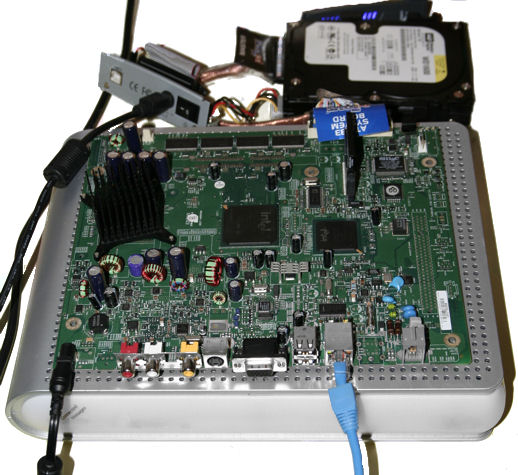
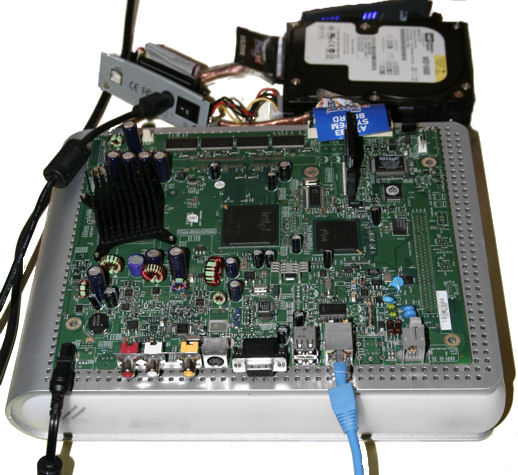
Picture of my current setup: