Browsed by
Category: My Projects

My Projects

2homeinfo dot com SPLOGs

2homeinfo dot com SPLOGs

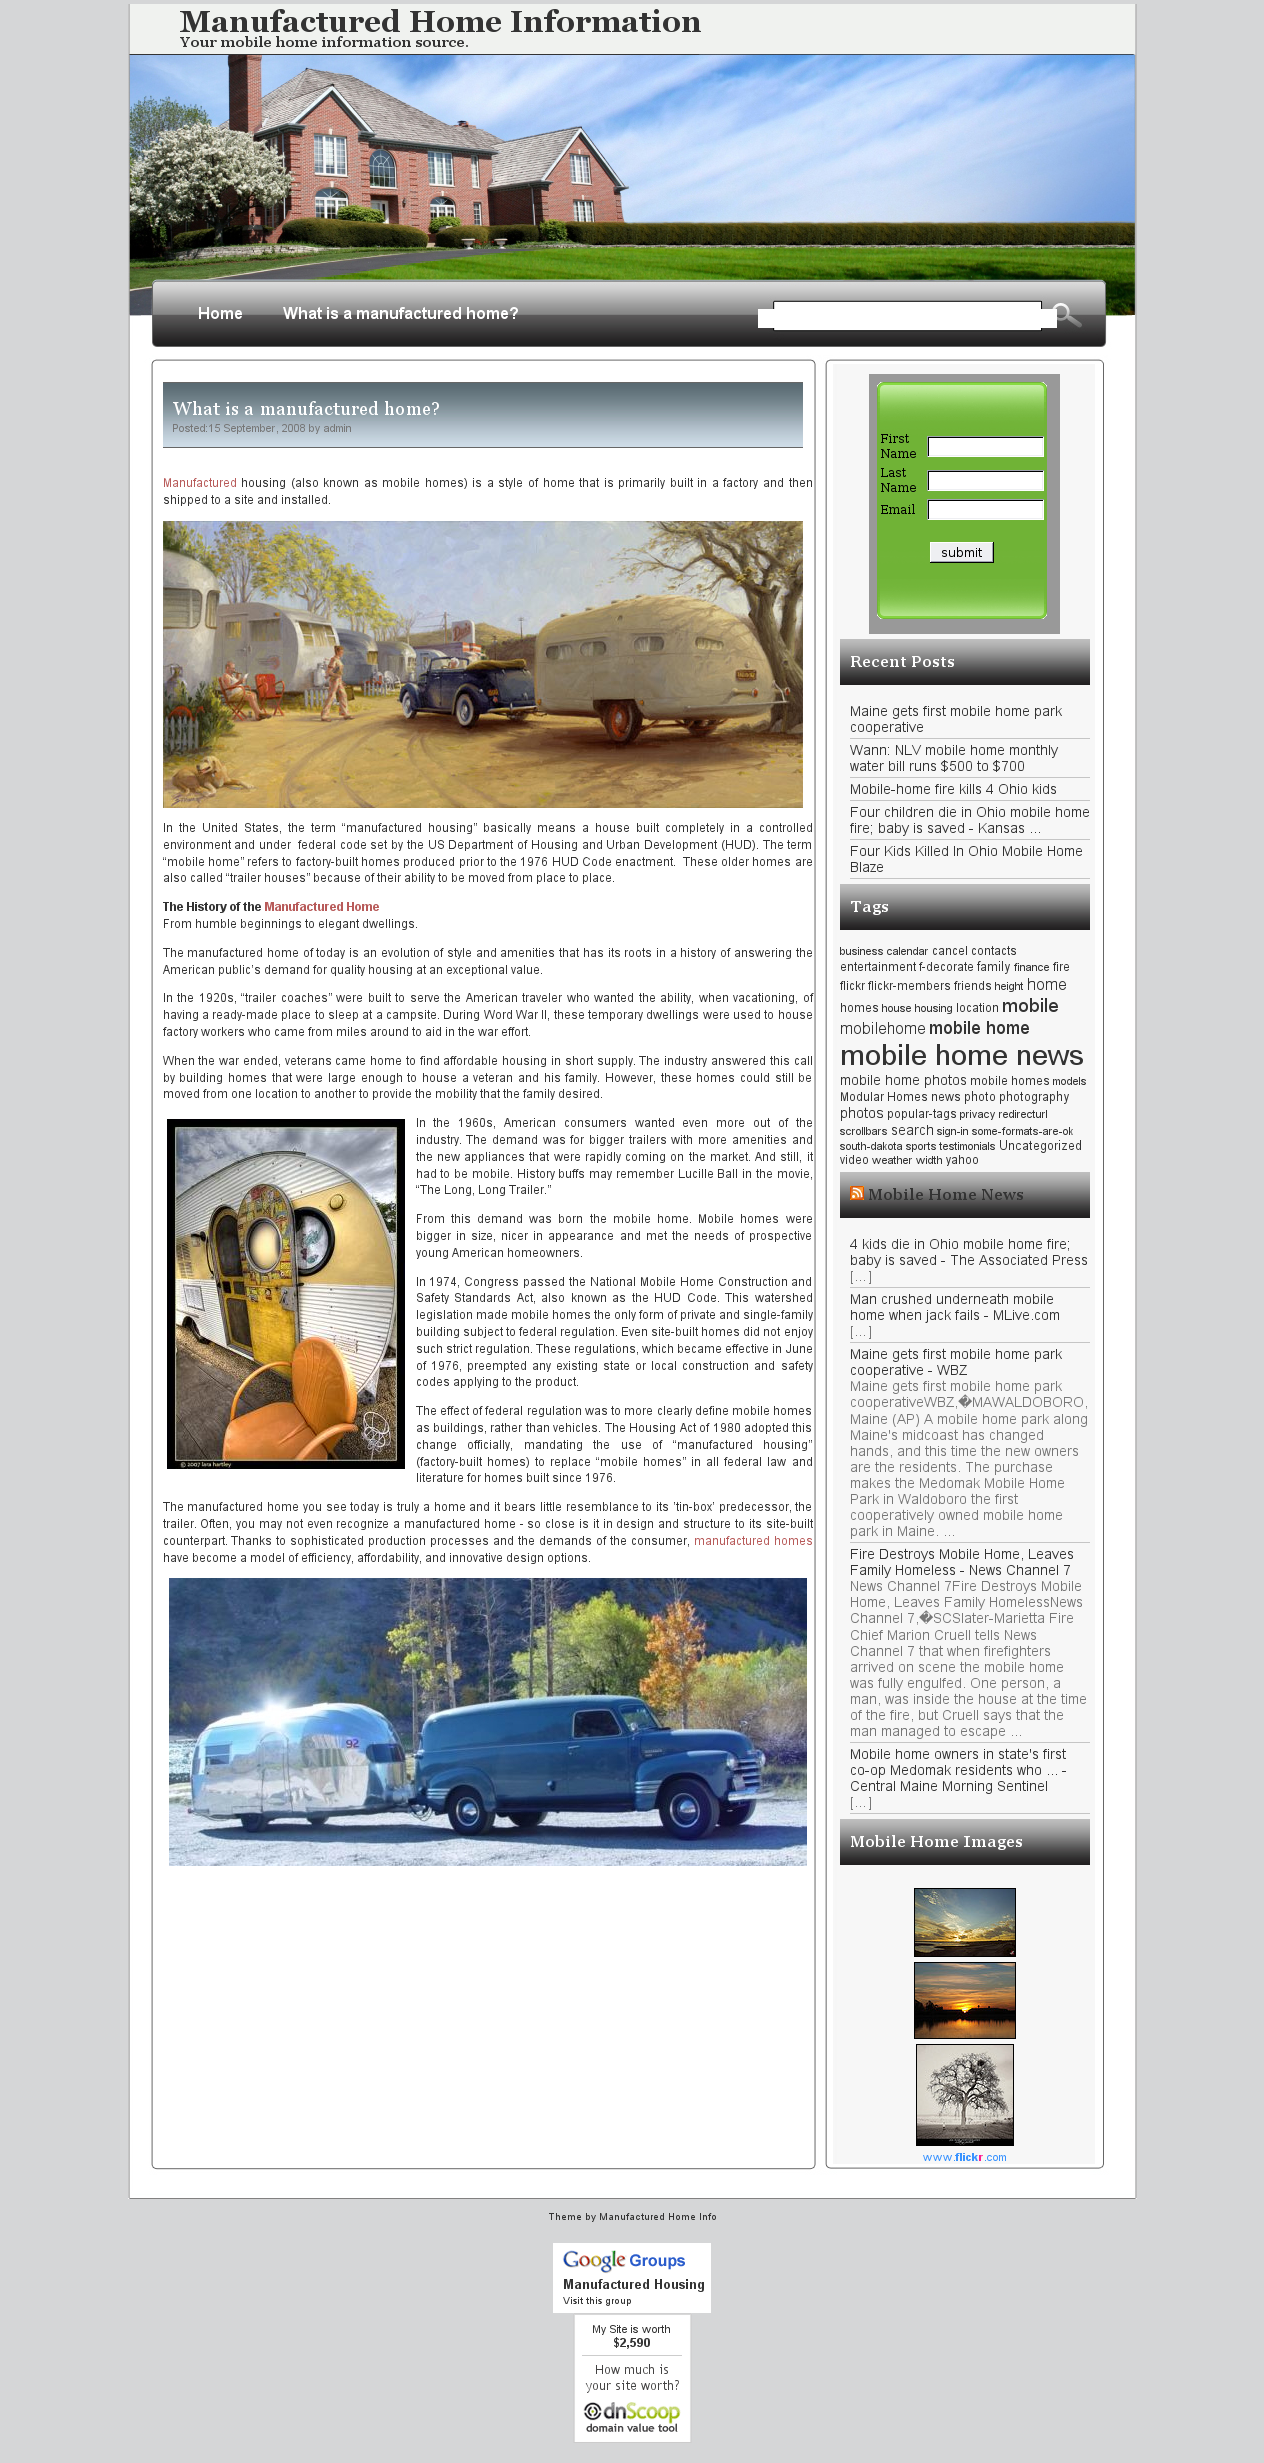
2homeinfo dot com is a (quite pretty) fascia for a giant splog ring.  Its posts, however pretty, link off to other sites, such as modularhomeweb dot com, (surprise surprise, it’s the same site, just copied over…), except this site has stories whose “original posts” are all on usedmobilehomes dot wordpress dot com.

And this is where the poop hits the fan, so to speak. On this site, each post ends with two SPAM URLs, each to its own SPLOG, along with links back to 2homeinfo  and other copies of 2homeinfo (to keep Google Pagerank up).

From here, the spam circle grows exponentially, where each splog links to 2 other splogs per post.

This SPLOG ring starts out with nicely laid out, handcrafted sites, and ends in bot-created trashy, ugly-looking splogs.

I’ve hand-reported a bunch of third-level Blogspot SPLOGS (that get linked to from usedmobilehomes dot wordpress) to Blogger Support. I’m going to let a spider run through this ring and see how big it is.

(Keep in mind that the bot that creates spam rings like this will throw in legit websites every now and then in a spammed link, to either throw you off the trail, or because that’s a site they want to boost PageRank on)

usedmobilehomes dot wordpress seems to be a news aggregator that pulls articles from other sources and adds its own links to them, along with its own two links at the bottom of each article.

Short story: 2homeinfo -> modularhomeweb -> usedmobilehomes dot wordpress -> Hundreds of different splogs

Update: I received an email from WordPress support regarding usedmobilehomes dot wordpress:

Thanks for the note.

I searched on blog owner, IP address and links from the blog. Caught around a dozen others though none – it seems – directly related to that blog.

But the blog is bookmarked so we keep an eye on what may come from the same place.

So it seems that spammers aren’t just one-trick dogs.

SPLOGS on Free Blog Hosts hosting with WordPress MU

SPLOGS on Free Blog Hosts hosting with WordPress MU

This type of SPLOG targets WordPress-MU-based free blog hosts such as siggie.net.

This SPLOG posts blocks of text that may be copied from other sources, and/or mixed together to create a regular-looking block of text, generally with entire coherent sentences but not coherent paragraphs. Random groups of words are linked to the target sites, which are either:

  • other iterations of this type of SPLOG, running on WordPress MU and a free blog host (To let Googlebot search a huge network of SPLOGs, thinking they are legitimate sources, ie. Search Engine Optimization sites, as in the example photo)
  • ‘target’ sites (sites the spammers want to end up with a great Google PageRank score, hence showing highly on google for relevant searches)

The page in this particular example seemed to be all ‘target’ links, linking to various user profile pages on various websites.

Blogspot Amazon.com Affiliate Spam

Blogspot Amazon.com Affiliate Spam

This type of SPLOG (or Spam Blog) is essentially an amazon.com category listing created by a spider. It copies images and descriptions straight from the corresponding Amazon.com page, and posts it to the SPLOG, complete with affiliate link.

This particular iteration creates a blogspot account and creates the maximum number of blogs (5), with names appropriate to what they are ‘selling’ (ie. Grinder Accessories, Collectibles, Nancy Drew books, etc.), with a URL that is slightly mangled (ie. grrinderaccessories.blog…, co-llectibles.blog…, etc.)

If and when you click the links to the items they are peddling, and actually purchase something from Amazon.com, the spammers make money.

Although this is a decent way to make income, keep in mind that the websites mentioned add nothing of value over what you get directly from amazon.com. There are no ‘personal reviews’, no added human commentary to recommend one over another, etc. Please don’t feed the spammers.

POM PPM Parking Meter

POM PPM Parking Meter

I found this parking meter at Princess Auto yesterday. Made by POM Inc., this meter is called the PPM.

I got it to work by adding a rubber band with just enough tension to depress the turn-detect lever when the lever is turned. The meter has knobs where a tensioned spring was attached. I’ll have to find a decent spring somewhere.

Opening it up, I found that the coin detector uses a series of armatures and four switches to detect which coin was inserted.

Upon examination, it has 6 buttons:

  • (Top Left) Yellow button for debug output
  • (Bottom Left) Yellow button for turn-sense
  • White buttons (4) for coin sense

When a Quarter is inserted into the proper slot and the arm is turned…

  1. As the coin lever is turned, the turn button is pressed.
  2. As it passes the buttons, the quarter makes the arm hit all 4 white buttons, in a clockwise order starting with the top left.
  3. When the turn lever is released, it returns to its original position, and releases the turn button.

When a Dime is inserted into the proper slot and the arm is turned…

  1. As the coin lever is turned, the turn button is pressed.
  2. As it passes the buttons in a clockwise order starting with the top left, the quarter makes the arm skip the first white button, and hits the remaining 3 white buttons.
  3. When the turn lever is released, it returns to its original position, and releases the turn button.

When a Nickel is inserted into the proper slot and the arm is turned…

  1. As the coin lever is turned, the turn button is pressed.
  2. As it passes the buttons in a clockwise order starting with the top left, the quarter makes the arm skip the first 2 white buttons, and hits the remaining 2 white buttons.
  3. When the turn lever is released, it returns to its original position, and releases the turn button.

When you press the Debug button, the front LCD shows the following:

  1. Test pattern: “c2:2c”, where the last ‘c’ is backwards.
  2. Firmware Version?: “0159”, also the number writen on a sticker on top of the ST27C256
  3. Parking Limit: “0002”, maximum number of hours allowed to park
  4. Route?: “0321”, also printed on a sticker on the back of the meter. This was the same for other meters i saw.
  5. Unknown: “8:5”, “8:6”

Interesting innards:

LCD/LEDs

  • LCD1: LCD, Front: 4-digit, “88:88” LCD
  • LCD, Back: Red, Clear background. No text.
  • D3: Red LED, (clear casing)
  • D4: IR LED
  • D5: IR Sensor

Switches

  • SW5,6: Yellow Switches (Surface mount)
  • SW1,2,3,4: White Switches (Surface mount)

ICs

  • U6: Motorola MC14519B – Four bit AND/OR selector
  • U2: Motorola MC14521B –
  • U7: Motorola MC145453FN – LCD 33-Segment LCD Driver, Serial, CMOS
  • U5: Motorola MC68HC11A1FN – Motorola 8-bit Microcontroller, 256 Kbit RAM, A/D converter, EEPROM
  • U4: Fairchild MM74HC373WM

    – 3-STATE Octal D-Type Latch

  • U3: THMOS ST27C256 – 256Kbit (32Kx8) CMOS 3-STATE (UV-Erasable?) EPROM
  • U1: 271BC – Programmable Low-Power OP-Amp
  • U8: Motorola HC20 – Dual 4-input NAND gate
  • U9: 74HC02M – Quad 2-Input NOR Gate

Headers

  • J2: 4-pin header
  • JP4, JP3, JP2, JP1: Jumpers, unpopulated, to ground certain pins on U5

See also:
http://www.globalnerdy.com/2008/07/17/rubyfringe-guide-active-surplus-aka-hardware-nerdvana/
Pics in action:
http://www.sonomatlc.org/Parking/PBDs/Pkg_Benefit_Districts.htm
http://www.dkimages.com/discover/DKIMAGES/Discover/Home/Geography/North-America/United-States/Travellers-Needs/Practical-Information/Transportation/Roads/Chicago/Parking-Meter/Parking-Meter-1.html

Diff Script for Applying DS Updates

Diff Script for Applying DS Updates

Here’s a command I wrote for DS lib, it goes in as /secure/cmds/admins/diffit.c and responds to the “diffit” and “help diffit” commands.

Steps to use:

  1. When an upgrade is available, do a `liveupgrade all`
  2. Once it has finished downloading, do a `diffit`. You will be prompted for each file that is being upgraded to [K]eep the current version, or [R]eplace it with the new version.
  3. Once finished, see /log/diff.log for errors, and /log/diffkeep.log for files you chose to [K]eep (You will need to upgrade these files manually).

Future features:

  • “More” for long diffs
SQL Daemon for DS

SQL Daemon for DS

With much anticipation, here is my SQL code: it allows both blocking and non-blocking SQL sockets to be used simultaneously. I’ve tried to be very verbose in my commenting, and I will include some examples later on, too.

This stuff works to the best of my knowledge. If not, leave me a comment and I’ll try to look at it.

Terminology:

  1. “Non-blocking SQL sockets” are sockets that execute a callback function once the SQL data is retrieved. Ideally, this is how you will access all SQL data. (Technically: This type of socket uses extern_cmds to pipe data to and from the ‘mysql’ command through the use of callbacks)
  2. “Blocking SQL sockets”, however, are sockets that take 100% of the driver’s attention until the SQL data is received. Nothing else is executed while it is in use. The ONLY reason you would use this type of socket is when you NEED a
    response from the SQL server before continuing to the next line of code. (Technically: This type of socket uses efuns compiled into the driver to communicate with the SQL server directly)

Planned features:

  1. Allow MSSQL, Oracle, and other databases
  2. Transaction support (Partially implemented so far)

The code contains three distinct sections:

  1. Shared code
  2. Exclusively “Non-blocking” code
  3. Exclusively “Blocking” code

Steps you will need to take to make this usable:

  1. Compile a driver with SQL support
  2. Make sure you have a usable SQL server
  3. Create a database for MUD-related stuff, default ‘mud
  4. Create a user for general-purpose access with only the required permissions (ie, SELECT, INSERT, UPDATE on non-sensitive tables only) and restrict the user to the mud database.
  5. (Optional, strongly recommended): Create a user for mud-admin access with only the required permissions (ie, SELECT, INSERT, UPDATE, DELETE) and restrict the user to the mud database.
  6. Place db.h in /secure/include/ and edit it to suit your installation
  7. Place sql.c in /secure/daemon/
  8. Edit /secure/daemon/master.c to allow the SQL daemon to access a socket (See attachment)
  9. Add “external_cmd_1: /usr/bin/mysql” (without the quotes) to /secure/cfg/mudos.cfg
  10. Create tables to support data for your mud (See attached “mud.sql“)
  11. Add SQL support to files that you want to be able to access the database (See attached examples)
Add your driver and addr_server to monit: How-To [Beta]

Add your driver and addr_server to monit: How-To [Beta]

This how-to is still in testing. I got it to work, however, the how-to may not be totally complete or correct. Please let me know how it works for you.

  1. Set up monit Monitoring Service on your Linux box
  2. Add the following to your /etc/monit/monitrc: (The “as uid” line is optional, use it only if you want to run your mud as a different user)

    check process driver with pidfile /home/mud/bin/driver.pid
    start program "/home/mud/bin/startdriver"
    as uid mud and gid mud

  3. Optional: If you want addr_server, add this to /etc/monit/monitrc too: (The “as uid” line is optional, use it only if you want to run your addr_server as a different user)

    check process addr_server with pidfile /home/mud/bin/addr_server.pid
    start program "/home/mud/bin/startaddr_server"
    as uid mud and gid mud

  4. Create a file called startdriver in your MUD’s “bin” directory: (change /home/mud to the location of your mud’s directory (the one containing ‘bin’ and ‘lib’)):

    #!/bin/bash

    export MUDHOME="/home/mud"

    umask 007
    ulimit -n 120
    $MUDHOME/bin/driver $MUDHOME/lib/secure/cfg/mudos.cfg &

    rm driver.pid
    ps -ef | grep /bin/[d]river | awk '{print $2}' > driver.pid

  5. Optional: If you want to set up addr_server, create a file called startaddr_server in your MUD’s “bin” directory (again, change /home/mud to the location of your mud directory):

    #!/bin/bash

    /home/mud/bin/addr_server 9999 &

    rm addr_server.pid
    ps -ef | grep /bin/[a]ddr_server | awk '{print $2}' > addr_server.pid

  6. Restart the monit service:
    /etc/init.d/monit restart