Browsed by
Tag: Arduino

Driving a WS2811 RGB LED Strip with an Arduino

Driving a WS2811 RGB LED Strip with an Arduino

I recently purchased a WS2811 RGB LED strip for PC case modding purposes. I will be making an ATMega-based controller for it, so I decided to use an Arduino for testing and prototyping.

I found two libraries capable of driving this strip:

Plus many great links regarding the WS2811 at the Noisebridge Wiki.

I recommend trying out funkboxing’s FastSPI2 effects as great examples of using the FastSPI2 library. You will need to use the line LEDS.addLeds<WS2812, 13, GRB>(leds, NUM_LEDS); to properly initialize the code.

EExtractor: An (EE)PROM-Extracting Arduino Shield (Beta)

EExtractor: An (EE)PROM-Extracting Arduino Shield (Beta)

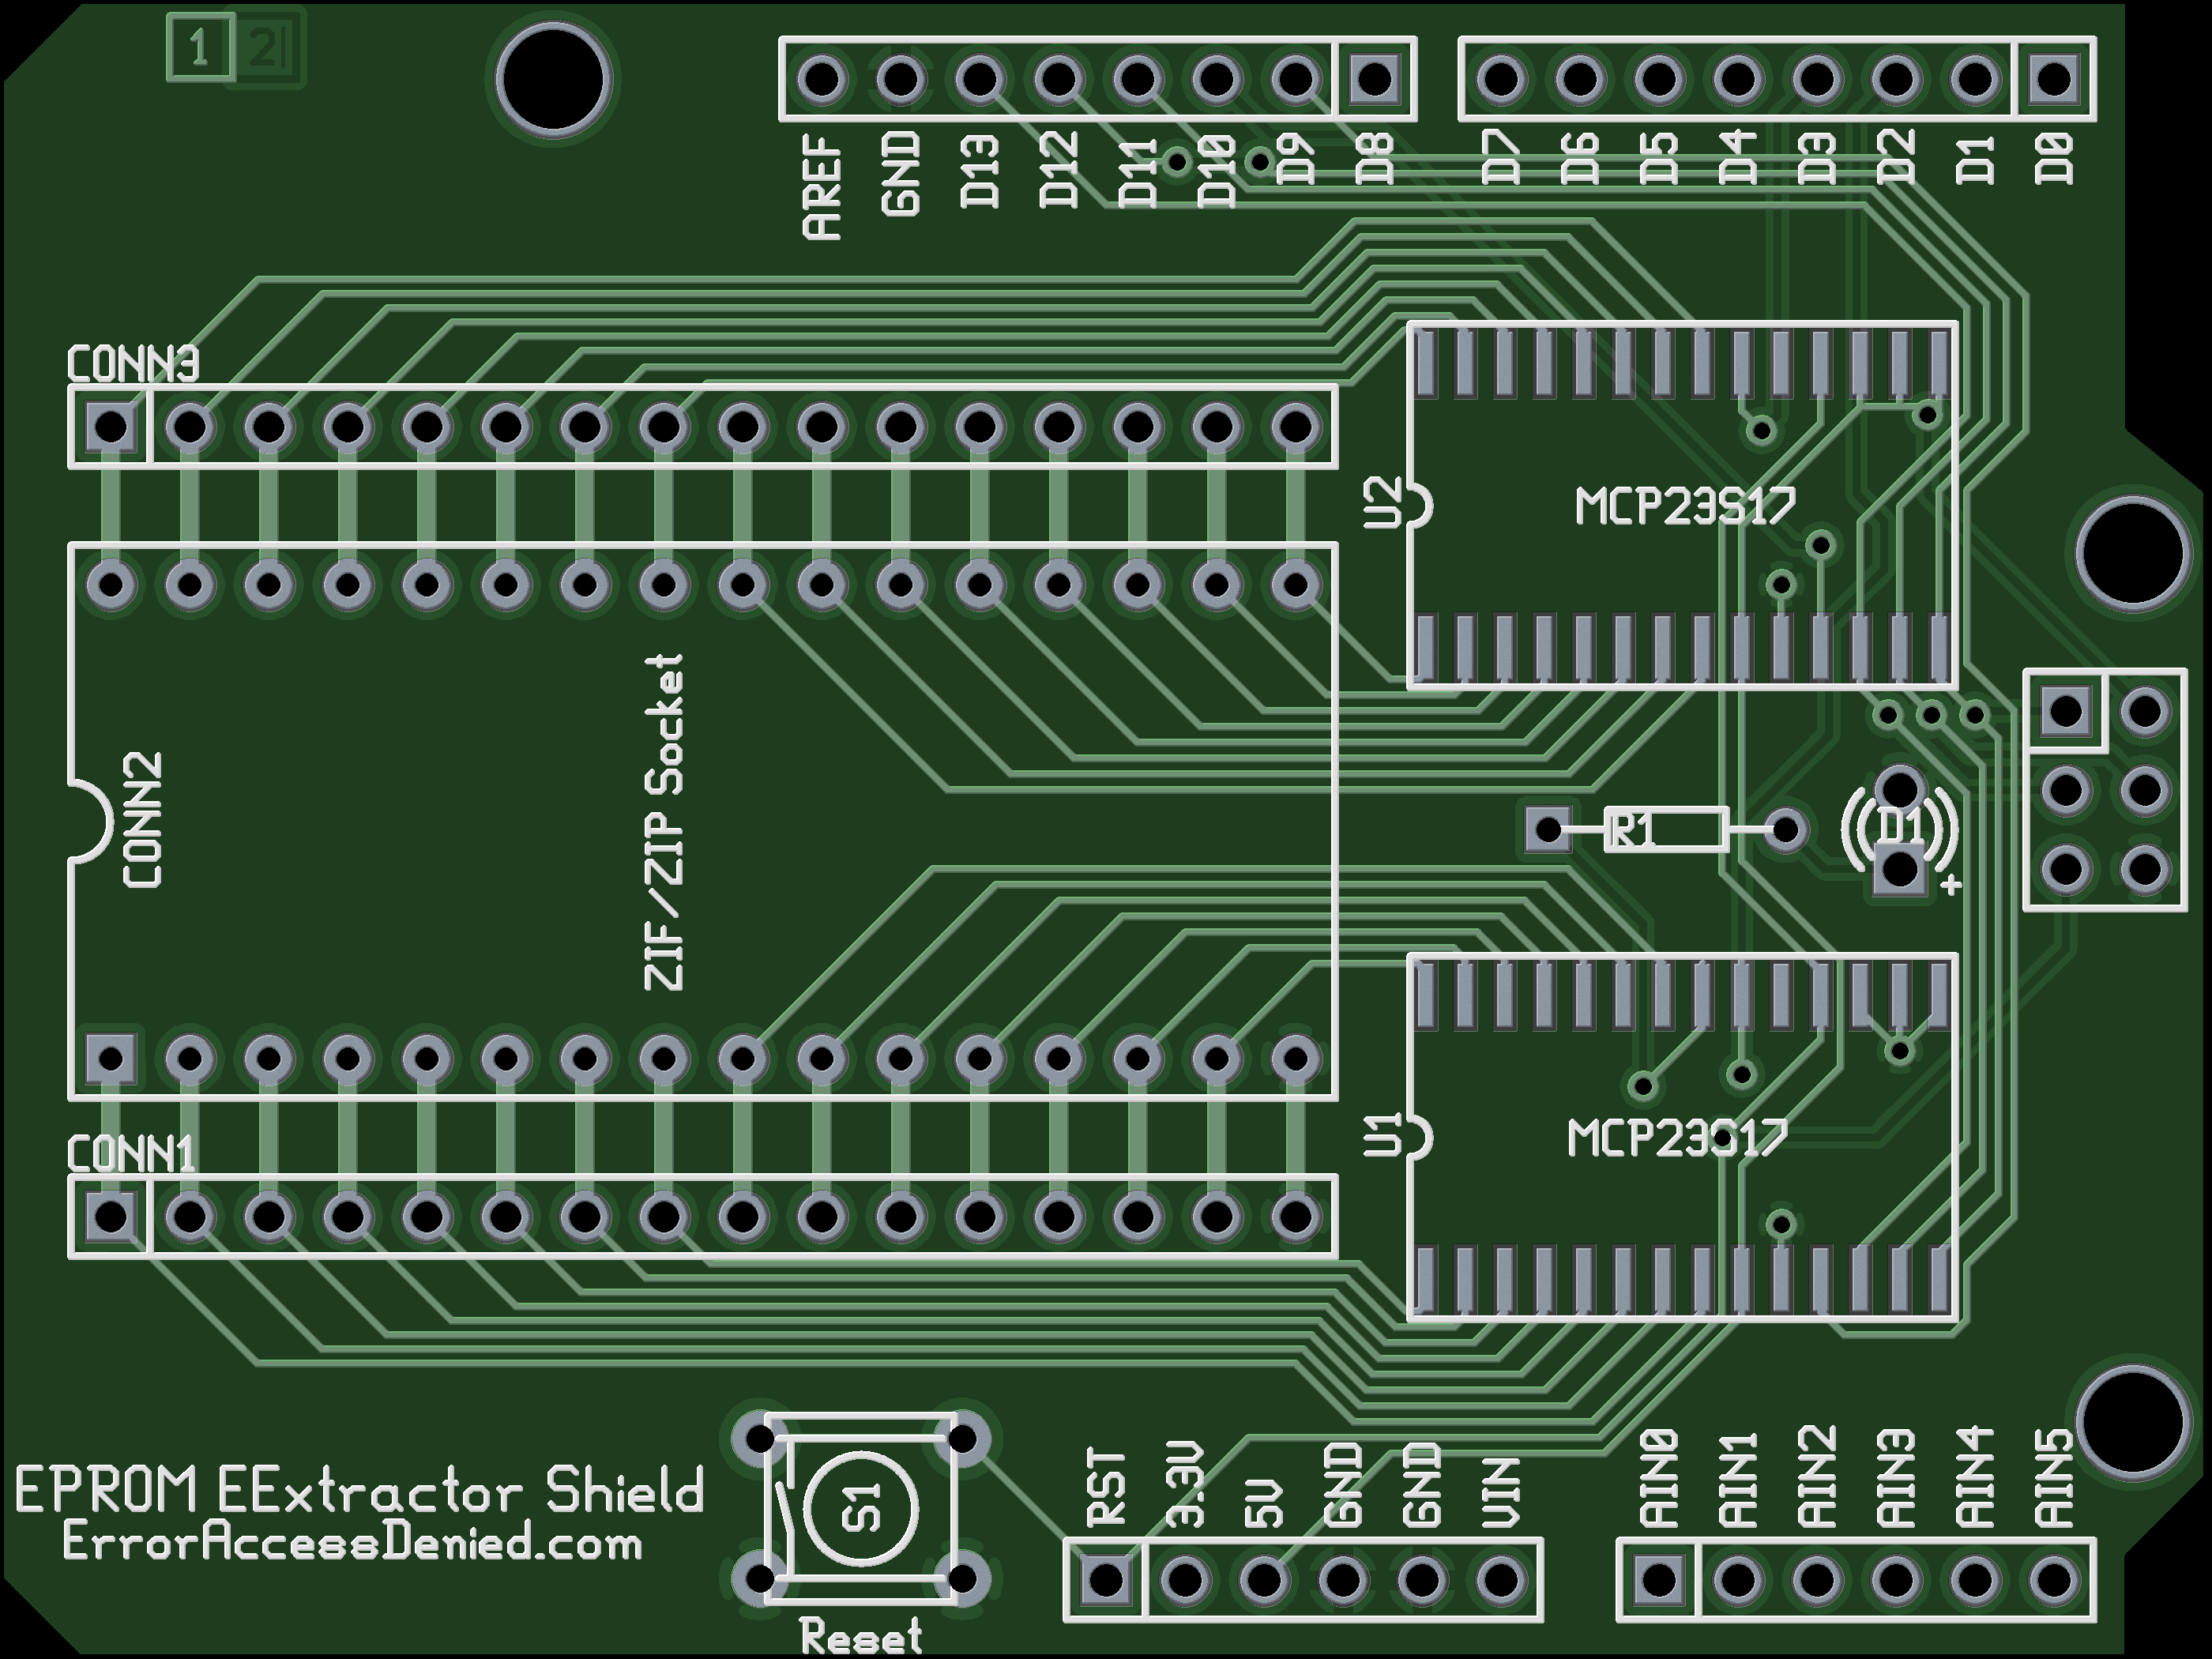
Purpose: EExtractor is an Arduino-compatible Shield that allows a user to dump (or download) the contents of a ROM chip (ROM, PROM, EPROM, EEPROM, etc). 

Hardware Method: The EExtractor uses two SOIC MCP23S17 ICs to control the 31 (32 minus ground) pins of the ZIF Socket. This (ideally) allows the user to address any size or pinout of PROM IC up to, and including, 32 pins. Headers are broken out to allow for direct powering of PROM pins from the Arduino’s +5V port (if needed).

Software Method: The Arduino (or compatible) software will correctly configure pins (inputs/outputs, Hi-Z, pull-ups, etc) to allow for proper reading of the IC’s data. The software will then proceed sequentially through each byte of the PROM, outputting it along with a verification or checksum.

(The code is still under construction at this time.)

Availability: PCBs will be available once testing is complete.


EExtractor was made using the Open-Source gEDA suite of tools, including gschem, pcb, etc, and, as always, a little symbol and footprint help from gedasymbols.org.

All materials, schematics (.sch), PCB Layout (.pcb), and related derivatives such as PCB renderings, schematic renderings, .ps, .pdf, .gbr and .cnc files, or other Gerber-format files and PCB boards produced with them, collectively known as v1.0 Beta 1, are released under the CC BY-SA 2.5 Canada license.

*EExtractor is not sponsored or otherwise supported by Arduino. The Arduino name used only to signify compatibility.

gRover Robotics Platform

gRover Robotics Platform

This is gRover, the Grove-Platform Rover; it is a general, all-purpose rover for house exploration.

Foreword:

This page is a bit of a mess, I’ll admit. The PDF file attached is much neater and contains much more information about the project than this page’s text does. For more pictures, see the gRover Flickr Photoset. This rover build uses parts graciously provided by Seeed Studio.

Description:

I purchased an RC car from the thrift store for $2. It had no remote control to go along with it, but it did have a 4.8V Ni-Cad battery pack, a chassis, a steering motor, and a drive motor. While the 4.8V Ni-Cad battery does not have enough voltage to power the I2C Motor Driver (it may be useful in another project), the motors and chassis provide a great base for a robot.

Features:

To me, this build was more about making a framework that other users could utilize to easily use the Grove platform to make a rover. I created gRover with the following (easily-modifiable and easily-expandable) features:

  • Autonomous Mode: Drive the rover around autonomously using the on-board sensors for guidance
  • Remote Control: Drive the rover around with commands sent over the serial port (currently non-functional, as it interrupts I2C. A Bluetooth Twig using NewSoftSerial should work well.)
  • Cat Spooker: Lie in wait until a cat approaches, then make some noise and start Autonomous mode (This can be replaced with something more interesting. I’m open to suggestions)
  • Cat Taunter: Make a noise every 15 seconds while there isn’t a cat in the area. (Ditto)
  • Motor Test: Run a test of the motors connected to the I2C Motor Driver Twig
  • Sensor View: Get a live view of sensor data on the OLED Display

Parts:

Qty

Part Name

SKU#

1

R/C Truck

1

Arduino (or Arduino Clone)

1

Battery Box (Output: 8-15V)

1

Stem – Grove Base Shield

SLD12148P

1

Twig – OLED Display 128×64

OLE35046P

1

Twig – I2C Hub

ACC53133P

1

Twig – I2C Motor Driver

ROB72212P

1

Twig – I2C Touch Sensor

SEN51153P

1

Twig – Sound Recorder

SEN71254P

1

Twig – Buzzer

COM22458P

1

Twig – PIR Motion Sensor

SEN32357P

1

Twig – 80cm Infrared Proximity Sensor

SEN39046P

1

Twig – 3-Axis Accelerometer

SEN21853P

2

Twig – Chainable RGB LED

COM53140P

1

Twig – Sound Sensor

SEN12945P

1

Twig – Vibrator

ROB51043P

3

Grove – Universal 4-Pin Cable (5 ea)

ACC113170

Part Usage: The Twigs perform the following tasks:

  • The 3-axis Accelerometer Twig helps track the rover’s movements, and can be used to tell if it is standing still (despite motors turning) (not currently implemeted into Auto Mode)
  • The OLED Display 128×64 Twig and I2C Touch Sensor Twig are used as a User Interface, mounted on the top of the robot (or under a clear polyurethane shell for weatherproofing). The Vibrator Twig is used as tactile feedback for the I2C Touch Sensor Twig’s buttons, (also known as “feelers”) which aren’t physical buttons but actually touch sensors.
  • The Buzzer Twig is used as audible feedback in addition to the Vibrator Twig’s tactile feedback, and can be used for sound effects if the Sound Recorder Twig isn’t used.
  • The PIR Motion Sensor Twig is set to a fairly short range, and is used to either detect obstacles, or (in some cases) wait for obstacles (like cats!) to approach it.
  • The 80cm IR Proximity Sensor Twig is used to detect obstacles ahead of the rover.
  • The Sound Recorder Twig has various sounds recorded, such as a monster-truck engine and a car horn.
  • The Chainable RGB LED Twigs act as pseudo-Police flashing lights (with two RGB LEDs, flashing in a red/blue pattern)
  • The Sound Sensor Twig is used to control the robot by clapping. (Not currently implemented into Auto Mode)
  • The I2C Motor Driver Twig is used to control the drive and steering motors in the RC car.

Downloads:

For more information, please see the attached PDF file. The code (which is ~1850 lines long, including lots of comments) is attached as a ZIP file.

The code is CC BY-SA licensed to the extent possible, given that the code has minor sections taken from example code from the Seeed Studio wiki (links are available in the PDF and in the code headers), and for the Touch Sensor Twig, from Rory Nugent (cited in the code).  If I have missed a citation, please let me know.

The documentation PDF is CC BY-SA.

QuahogCon 2010: My Freeduino (From AlphaOne)

QuahogCon 2010: My Freeduino (From AlphaOne)

This is my new Freeduino, which I purchased as a kit from the fine folks at the AlphaOne Hackerspace table at QuahogCon 2010.

I assembled the kit together at the Hardware Hacking Lounge with some super-sweet soldering irons, then spent the next hour and a half trying to figure out why it wouldn’t work. Turns out that it needed a jumper on the USB/External power selector. Thanks to Mr. Jimmie Rodgers for the eagle-eye lack-of-jumper spotting.

I already have an Arduino (the original); however, it doesn’t have a pin for the reset line or 3.3V line on the headers, so I guess it will just be relegated to different tasks.

I had planned to submit an entry into the Alpha One Labs Hackerspace’s Arduino Hacking Contest, though I ended up spending every waking moment trying to hack the Humans vs Zombies game. Apparently, I was not the only one with not enough time; there were unfortunately no entries into the contest 🙁 I ended up receiving honorable mention (consisting of a T-shirt) for constructing my Freeduino.

Hopefully, there will be an Arduino Hacking contest next year… Start building those Arduino projects!

Sparkfun.com Stuff: Arduino Shield, Breadboarding Supplies, etc

Sparkfun.com Stuff: Arduino Shield, Breadboarding Supplies, etc

My latest Sparkfun.com order.

For PIC programming:
BOB-00193 (1): Adapter board for Microchip ICD and ICD2

For (hopefully) adding some IR functionality to my QuahogCon badge:
COM-09349 (4): Infrared LED – 950nm

For parts:
DEV-00348 (2): Olimex Carrier Board for OKI ML67Q5003

For prototyping on the Arduino (and otherwise generic prototyping):
DEV-07914 (1): Arduino ProtoShield Kit
PRT-07915 (1): Breadboard Mini Self-Adhesive (For Protoshield Kit)
PRT-09567 (1) : Breadboard Clear Self-Adhesive (For other breadboarding)
PRT-00124 (1): Jumper Wire Kit
PRT-08430 (1): Jumper Wires Premium 6″ F/F Pack of 10
PRT-08431 (1): Jumper Wires Premium 6″ M/M Pack of 10
PRT-09140 (1): Jumper Wires Premium 6″ M/F Pack of 10