1995 Chevrolet Corsica

1995 Chevrolet Corsica (L-Body)
- GM 3100 60 degree V6 Engine (3.1L)
- 4T60-E Transmission (4 speed, automatic, with Torque Lockup Converter)
- Power Door Locks, added a Keyless Entry/Remote Start system
My Projects
1995 Chevrolet Corsica (L-Body)
I currently have a Canon EOS Digital Rebel XT (Black) (aka EOS 350D).
It came with:
1x Li-Ion Camcorder Battery (NB-2LH)
1x Camcorder Battery Charger
1x Shoulder Strap
I also have:
1x Digital Rebel Accessory Kit, including:
– 1x Lowepro Camera “Gadget” Bag (Canon embroidered)
– 1x Canon 58mm UV Haze Filter
– 1x Battery Grip for Digital Rebel XT (holds 1 or 2 camcorder batteries, or 6x AA batteries)
– 1x Li-Ion Camcorder Battery (NB-2LH)
Recent Purchases: (See Here)
1x Sigma 17-70mm F2.8-4.5 Macro
1x 72mm B+W U/V Haze Filter
1x Sigma 70-300mm F4-5.6 APO DG Macro
1x Sigma EF-500 DG Super EO-ETTL2 Electronic Flash
8x Panasonic Rechargeable Ni-MH Batteries
Other Things I Have:
1x 58mm Circular Polarizing Filter
1x 58mm UV Haze Filter
1x Energizer Ni-MH and Ni-Cad charger (with an AC wall-wart and a cigarette-lighter adapter)
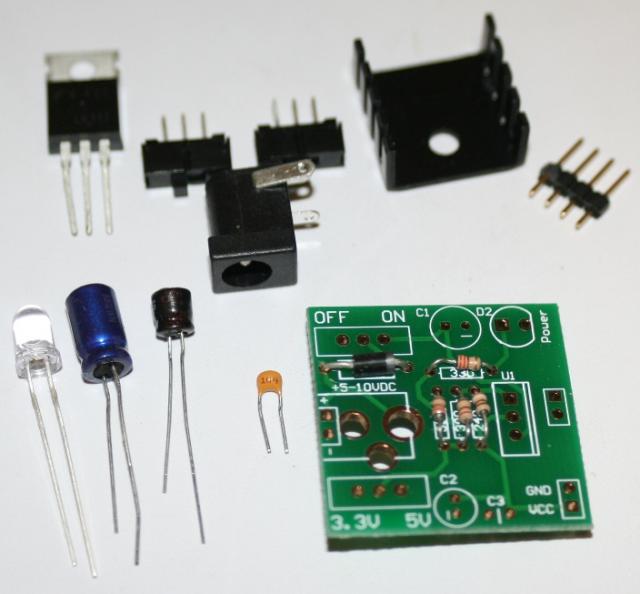
Here’s my “partially-assembled-and-disassembled-for-the-photo” breadboard power supply. It comes as a kit from SparkFun Electronics, as seen here, along with the optional heatsink for the voltage regulator, as seen here.

Ok, so not really a project, but just to show off, here’s the newest addition to the party going on in my camera bag.
Sigma 17-70mm F2.8-4.5 Macro (72mm filter size)
B+W U/V Haze Filter for my 17-70mm lens (hey, it’s cheap insurance)
Sigma 70-300mm F4-5.6 APO DG Macro (58mm filter size)
(I already have “Cheap Insurance” for this one, in the form of a U/V Haze Filter and Circular Polarizing lens from my old lens)
Sigma Electronic Flash EF-500 DG Super EO-ETTL2
8x Panasonic NiMH AA batteries
I got these all at the Views: 9,620
Ok, here I have a Symbol LT-1780 handheld barcode scanner. It has an RJ-45 cable with a 9-pin end (Not RS-232). I took an old RS-232 plug and put that on the end of the cable, and used that to wire it up to the Arduino.
Pics Soon.
Pins (from Female Serial side):
Ground (7)
+5V (9)
Barcode (2)
// Input
int barCode = 7; // Digitized Bar Pattern, connected to digital pin 7int duration1 = 0;
int duration2 = 0;void setup()
{
pinMode(barCode, INPUT);
Serial.begin(9600); // …set up the serial ouput on 0004 style
}// Main program
void loop()
{
duration1 = pulseIn(barCode, HIGH);
duration2 = pulseIn(barCode, LOW);Serial.print(duration1);
Serial.print(” “);
Serial.println(duration2);
}
I bought the CodeAlarm CA-145 off eBay for a reasonable price, but since I just installed a better, more expensive alarm system, and since the CA-145 is an “expansion pack”, not a system by itself, I figured I could hack around with it a bit 🙂
It came with a nice multi-tone siren, a 2-way remote, and a receiver for the remote, so I figure I can delve into the wild world of PIC microcontrollers by starting off with an interface between the input/output lines of my installed car alarm, a PIC, and the 2-way interface for the remote.
More on this page as it happens 🙂

This circuit is used to trigger a camera’s electronic shutter circuit when a flash of lightning is present. This circuit would also work for photographing fireworks displays or other events involving flashes of light.
It uses a photo-darlington sensor that looks through the viewfinder, and triggers the camera when the light is bright enough.
[Not my circuit, but was found at FC’s Electronic Circuits]
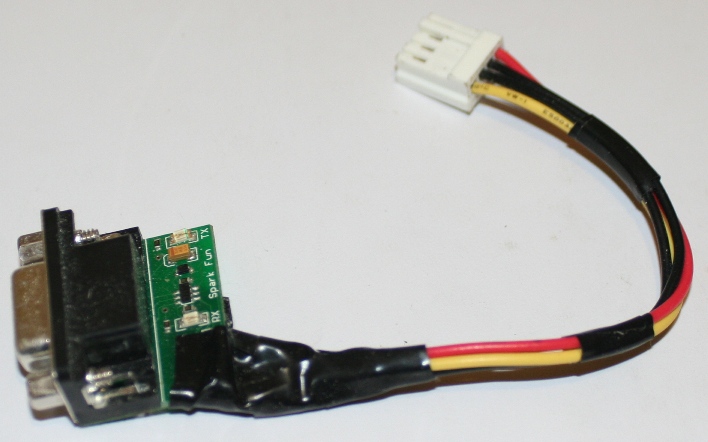
Here’s the quickest hack in the history of MSNTV2 hacking.
1x Spark Fun Electronics “Shifter”
1x Floppy Drive Power Cable (from an old power supply)
Pinouts (Cable Colors to Shifter Markings):
Yellow = “RX-1”
Black = “TX-0”
Black = “GND”
Red = “VCC” (3.3v)
Components Used:
2 Motors
1 Touch Sensor (Mounted on RCX for Remote, Wired Control)
Required Parts:
RIS 1.0
Electrical Connector Plate (White, Comes With 9V Motor Set)
Description:
Moves from one end of the string to another. When it gets there, the touch sensor hits the wall, (Or whatever is used to hang it) and it reverses directions.
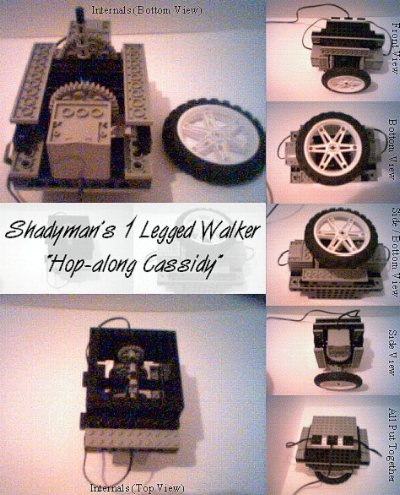
Well… What can I say? This is probably (I have yet to be proven wrong) – the LEGO Mindstorms’ Community’s First One-Legged Walker, and both simple and complex at the same time.
Two months of planning, failed designs (and waiting for my Vision Command webcam unit to arrive) has lead me to this point, getting to write all about my robot.
“Hop-Along Cassidy” uses both 9V Motors, which have been geared up and connected to create a sort of “Pulsating Shaft” (See attached videos) which quickly lifts up the foot by kicking the front “toe” (If I can call it that) into the ground, which lifts the robot up, then moves the foot so that it lands on the "heel" and moves the robot forward, and starts again. Doing this really fast creates a “Hopping” Motion. The motors are "additive", which means they combine their power so it is as if there is one, more powerful motor. This allows for a proper “Hopping” action, and also having 2 motors on opposite sides helps balance the robot.
“Hop-Along” has a generally low center-of-gravity, since the motors are the lowest part (besides the gears and the ‘foot’). This helps keep it from tipping over. As the walker progresses, it actually sways back and forth, as seen in the movies. This, I find, is actually unnoticeable because it happens so fast, though the VC Camera seems to slow it down enough.
(This is an independent site not authorized or sponsored by the LEGO Group.)
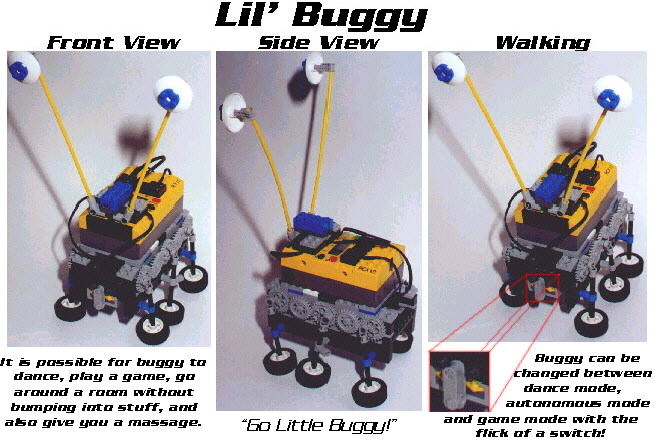
Components Used:
2 Motors
2 Touch Sensors
1 Light Sensor
Required Parts:
RIS 1.0
Parts from other LEGO Sets
Description:
Lil’ Buggy can:
1) Dance to the Macarena
2) Run around a room by itself without bumping into anything
3) Play a game with you
4) Massage tense muscles (like the ones you get after programming a bugbot for a few hours…)
His switch (seen in picture) allows him to change between modes:
GAME MODE
– Switch to the Right
In this mode, Lil’ Buggy will give you anywhere from 5-10 seconds, then it will beep. Once it has beeped, you have 1/2 a second to shine flashlight at the light sensor. (Don’t complain, it is possible, it helps to have the flashlight on and be ready to point it at the sensor.)
If you are able to do this, it will reward you with a sound like when it finishes downloading something. (Fast ascending sweep). If you can’t do this, it gives a low buzzing sound.
AUTONOMOUS MODE
– Switch in the Center
In this mode, Lil’ Buggy can roam free through a room without hitting anything.
This is done thanks to Proximity Sensing (the RCX sends out an infrared signal, which, if the RCX is close to something, will be picked up by the light sensor, and a certain string of codes will be executed)
For more information on Proximity Sensing, try searching in the LEGO Mindstorms Forums.
DANCE MODE
– Switch to the Left
In this mode, Lil’ Buggy burns up the dance floor dancing to the Macarena!
If only I had a video camera…
Not really much to explain about this mode – Lil’ Buggy dances to the Macarena, which it plays out of it’s internal speaker.
MASSAGE
– Either Switch to the Left or in the Center
This mode lets you relieve your stress while Lil’ Buggy massages you. (Quite handy after spending hours on the net… Trust me, I know.)
If you have the Switch to the Right, Buggy will dance on your back while playing the Macarena.
If you have the Switch in the Middle, Buggy will move forward.
(Both ways give you a good massage…)
I think this is my best robot so far.
“Go Little Buggy!”
(This is an independent site not authorized or sponsored by the LEGO Group.)