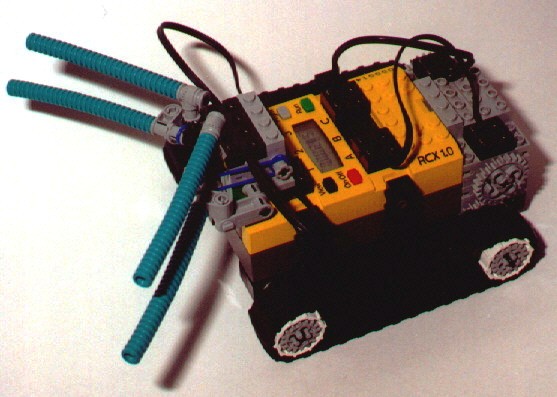
Browsed by
Category: My Projects

My Projects

Super Bugbot

Super Bugbot

Components Used:
2 Motors
2 Touch Sensors

Required Parts:
RIS 1.0

Description:
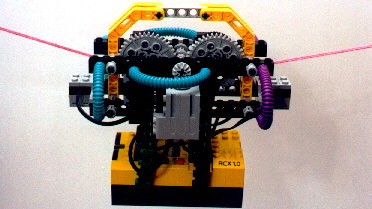
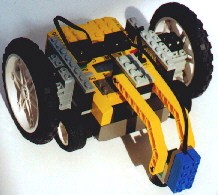
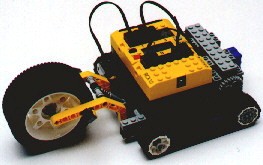
In essence, this is Dave Baum’s BugBot, (No copyright infringement intended). I added an extra set of antennae (To be able to sense further up, so it wouldn’t get stuck under the bottom of a chair, counter, etc). I also made the speed faster in the program so it can run around the room a little more efficiently.

Instructions:
Building instructions for Bugbot are found on page 109 of Dave Baum’s Definitive Guide to Lego Mindstorms Robots

(This is an independent site not authorized or sponsored by the LEGO Group.)

The Underbiter

The Underbiter

Components Used:
2 Motors

Required Parts:
RIS 1.0
Parts from other LEGO Sets

Description:
There is one motor to move the whole arm up and down, and one motor to open and close the hand. Possible upgrades could include pneumatics to raise and lower or open and close the hand, rotating arm, maybe even wrist motion.

(This is an independent site not authorized or sponsored by the LEGO Group.)

Tram Car

Tram Car

Components Used:
2 Motors (1 for movement and 1 for possible add-ons)
2 Touch Sensors

Required Parts:
RIS 1.0
Strong string to hang it on

Description:
Moves from one end of the string to another. When it gets there, the touch sensor hits the wall, (Or whatever is used to hang it) and it reverses directions.

Instructions:
Instructions are in Aerial.pdf.
Aerial.pdf is (c) 2000 The LEGO Group

(This is an independent site not authorized or sponsored by the LEGO Group.)

The Spinner

The Spinner

Components Used:
2 Motors
1 Light Sensor

Required Parts:
RIS 1.0

Description:
The robot can either be used as a line follower or it can be used to spin aimlessly in circles (Woo!) if the light sensor arm is removed.

(This is an independent site not authorized or sponsored by the LEGO Group.)

Big-Wheel

Big-Wheel

Components Used:
2 Motors
1 Light Sensor
1 Touch Sensor

Required Parts:
RIS 1.0

Description:
The robot moves forward until it hits something, (The wheel is forced upwards enough to activate the touch sensor behind), then it moves backwards, turns slightly, and moves forwards again. It also has a light sensor on the back for line-following.

(This is an independent site not authorized or sponsored by the LEGO Group.)

Canon EOS SLR Wired Shutter Release (Work in Progress)

Canon EOS SLR Wired Shutter Release (Work in Progress)

Ok, just starting out, but I’m going to make a shutter control as described here: “Super Mini Switch – A RS60-E3 Replacement”.

Parts I have so far:

From a broken Casio calculator:
2x Calculator Buttons (I’m trying to decide which ones, I’m thinking either C (red) or EXP (grey) for exposure, and ‘.’ (blue) for focus)
1x Rubber Layer with buttons to trigger touch sensor

From a broken CD Player:
1x 3.5mm Stereo Plug

From my cool junk pile:
1x Touch Sensor

From an old machine my dad got from work:
1x SPST Toggle Switch (Off/On)

From Dallas Semiconductor:
1x Plastic Box for shipping and storing ICs

It’s a shame what people throw away, really. I found the “Broken CD Player” smashed to pieces on the ground, ditto with the Casio calculator. Total cost so far: $0

Update: Stuff I got from the Dollar Store for the project:
Cell phone headset (for the 2.5mm plug) ($1)

Field Day 2006

Field Day 2006

Ok, so I went out to Field Day 2006 (Last full weekend in June) for Saturday evening, we didn’t have the stuff ready to camp out all night.

It was a fun day, including:

  • trying to find (dad’s) car keys in the grass for hours, to find them sitting in the lawnchair’s cupholder
  • getting lots of QSOs just as I sat down
  • an evening of mosquitos, chit-chat, QSOs

We finished the night by hitting a satellite repeater on my handy-talkie with Matthew, VA3MHB’s hand-held Yagi antenna. It was a team effort trying to hold everything together and point the yagi at the right spot, and although we didn’t make a contact, we did hear ourselves on the satellite downlink.